 English
Show prices in
Approximate prices. You always pay in USD. Exchange rates from . Rates By Exchange Rate API
 English
Show prices in
Approximate prices. You always pay in USD. Exchange rates from . Rates By Exchange Rate API
When you see a complicated embroidery design, do you ever ask yourself: “Where do I even begin?” If that sounds familiar, this post is for you.
This method is easy to follow, even for beginners. Think of it like building a sandwich: what you see on top gets stitched last, and what’s at the bottom gets stitched first. But instead of working backwards while digitizing, the Backsequence Method lets you digitize in the order you see, and then corrects the sequence in just one step.
In Wilcom, the first object you digitize gets stitched first, and the last gets stitched last.
Most people try to digitize in reverse (starting from the background), so the top pieces are digitized last and stitched last.
But that’s confusing.
The Backsequence Method flips that idea:
That way, your final stitch order starts with the background and ends with the front, even though you digitized front to back.
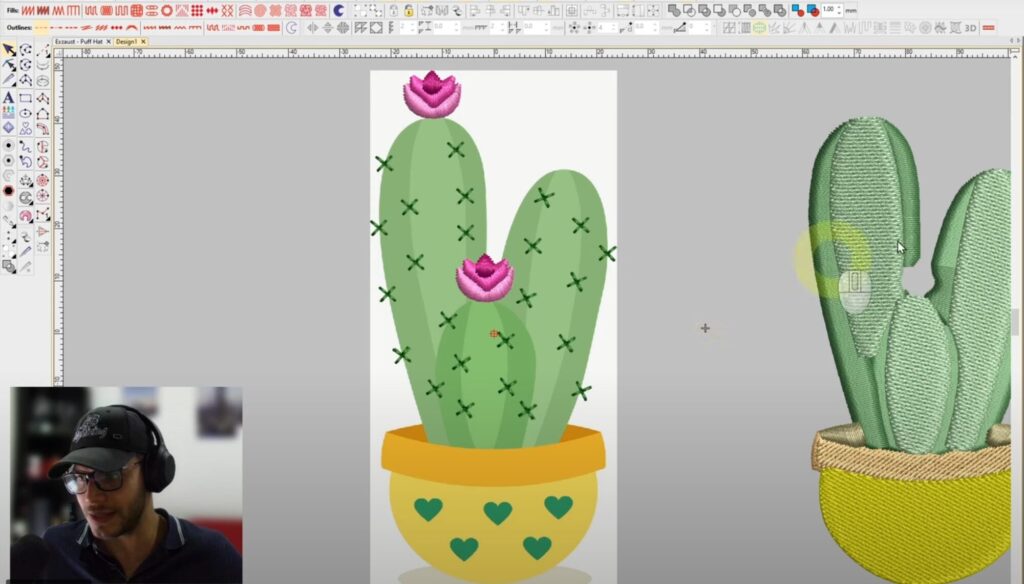
Let’s say your image shows a flower sitting on top of a cactus:
When you finish, your object list looks reversed: flower first, background last.
But once you select the objects from bottom to top and use the 1-2-3 tool, Wilcom reorders them perfectly.
Now your machine will:
Before digitizing anything, pause and study the image:
Think of each object as a sticker. The first sticker you place will be covered by everything else, so digitize from top to bottom, then flip the order with 1-2-3.
Wilcom lets you:
So don’t worry about sequence while you work. Just digitize each object clearly and logically as you see it.
I recommend:
Whenever I use a tatami fill, I always add a satin edge.
Tatami alone can look too rough on the edges. Satin borders give the shape:
This is especially important on rounded shapes like petals, hearts, and leaves.
When you’re done digitizing:
Use Wilcom’s 1-2-3 Sequencing Tool to reorder them properly.
Now your design stitches background to foreground, even though you digitized the other way around.
You can also use Ctrl + Shift + Tab to quickly select in reverse order.
This method solves so many common digitizing issues:
You get:
Try the Backsequence Method on a small design first. You’ll notice how much smoother your workflow becomes, especially on logos, characters, or anything with layers.
And if you don’t have time to digitize or just want guaranteed clean results…
If you want to apply this technique but don’t have the time, or if you’re working with complex logos, text, or custom artwork. I can help.
At ABDigitizing, I offer professional embroidery digitizing services with:
Let me take care of the technical work while you focus on stitching.
Comments are closed.
Hey Sebastian do you have coupons and I notic you have sports teams. Can you do a Boston Redsox hat logo and give me quote?